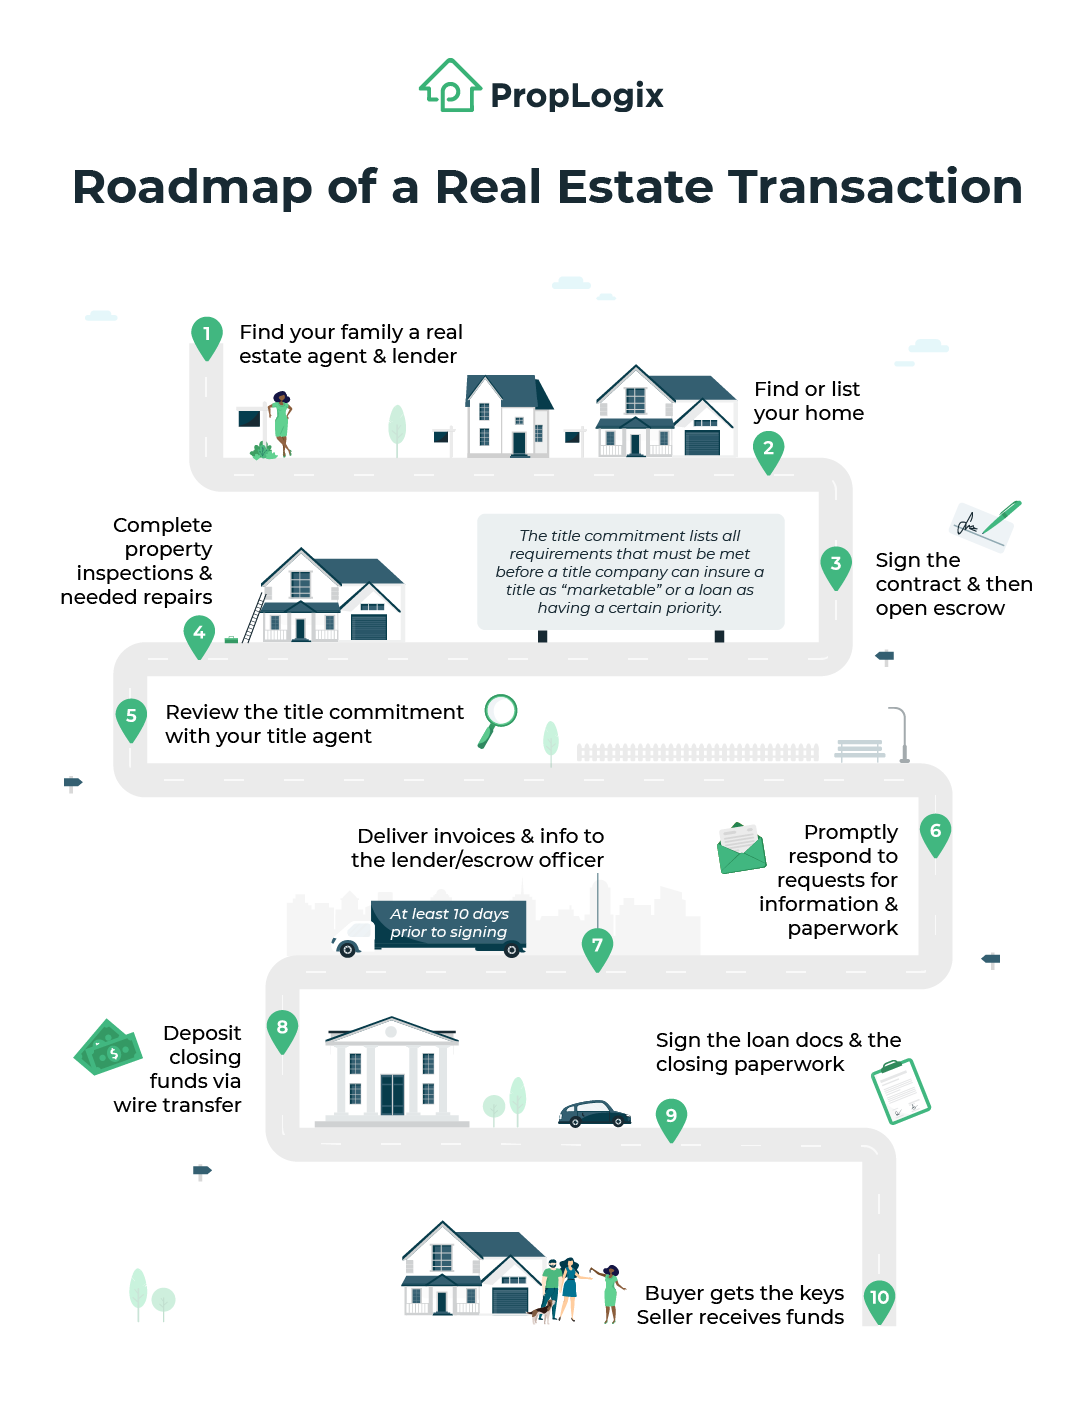
The 10 Steps of a Real Estate Transaction or Closing
Step One: Find a Trusted Real Estate Agent and Lender (Buyer)
Finding an agent or lender in today’s modern world is both easier and more difficult than years before. It’s easy to find options through online research without ever picking up the phone, but there are also many more options to compare. Be diligent in your search, shop around, and compare the agents and lenders available to you.
Your real estate agent is an important person you’ll need to lean on throughout the transaction process so having a great connection with them is essential.
How to find a real estate agent and lender:
- Ask friends and family for personal recommendations
- Use a trusted resource to search for local agents/lenders
- Shop around and compare options
- Have meetings and come prepared with questions
- Check for a strong online presence (website, blog, etc.)
Step Two: Find or List Your Home (Buyer/Seller)
Your real estate agent will be able to help list or find your home on the internet by utilizing the Multiple Listing Service (MLS) and their expertise with other online platforms. If you’re buying, doing research on your favorite neighborhoods, location or market conditions, and must-haves in a home is a great idea as well.
Your agent will be vital in helping you make a reasonable offer or at what price to list your home, but if you’re selling, make sure to get a recent appraisal to know precisely what your home is worth. You want to select an attractive price or offer that reflects the neighborhood and the current market conditions well, which can affect the price being above or below the appraised value.
Additionally, you’ll have to set aside time for showings if you’re buying or staging your home and fixing anything that needs to be repaired or replaced before the sale (or even have a seller’s home inspection). Another critical detail is including any necessary disclosures about the property. Depending on your state, there are specific details that must be outlined.
—> Click here for some homebuying horror stories related to listing disclosures
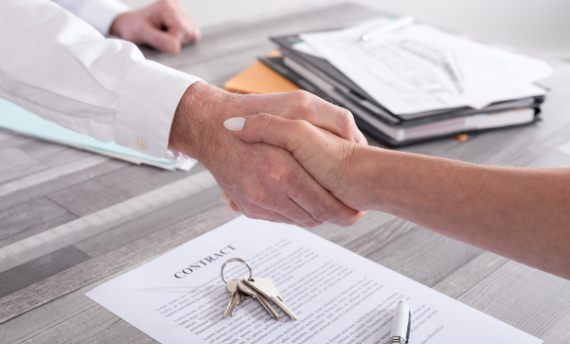
Step Three: Sign the Contract and Open Escrow (Buyer)
There will be a lot of factors to consider about the contract, such as home renovations, contingencies, and what the overall timeline should look like before signing. The negotiation process can be lengthy at times, so make sure you’re communicating everything to your agent on either side of the table. Repairs that need to be completed may also be negotiated into the contract to speed up the move-in date.
Escrow is another portion of the real estate transaction that can be confusing, but it serves an essential purpose. Opening an escrow account allows funds to be held safely so that both parties involved feel assured of the sale going through. The account is typically used for the good faith money deposit, taxes, and homeowner’s insurance.
—> Related reading: Should Homebuyers Waive a Contingency to Win a Bidding War?
Step Four: Complete Inspections (Buyer) & Repairs (Seller)
As mentioned earlier, a home inspection (and possibly other inspections) followed by repairs is a common step in the real estate transaction process. As a buyer, you’ll want to ensure the inspection is completed on your behalf. You may negotiate with the seller about any repairs that need to be made prior to move-in. In some instances, the repairs can be left to the buyer in exchange for a price adjustment.
—> Learn more about title insurance vs. homeowner’s insurance
Step Five: Review the Title Commitment with Your Title Agent (Buyer)
It’s not uncommon for many homebuyers and sellers to be confused about the role of the title agent in a real estate sale due to the brevity of their interactions. But they play a vital role in ensuring a home is free and clear of defects or essentially marketable. There are many encumbrances such as unpaid taxes, utilities, or other fees that could eventually become a lien on your property.
The role of the title agent is to conduct the research into a property’s history until no stone is left unturned. Once they’ve determined the property is clear, they’ll issue a title commitment which essentially ensures that the home is both marketable and safe to be protected by title insurance.
—> Read more about what a title company does and a title agent’s role
Step Six: Send Any Necessary Information and Paperwork
Now comes the fun part: reviewing the paperwork and sending any necessary information to your real estate agent, title company, and lender. You’ll need to respond promptly to these requests to avoid delays and both the buyer and seller will have a lot to review.
Step Seven: Deliver Invoices/Info to the Lender/Escrow Officer
The verification process varies by state, but invoices for paperwork completion will need to be sent to the respective parties. Once the aforementioned papers are signed, the new deed will be prepared for the buyer and sent to the recording jurisdiction.
Step Eight: Deposit Closing Funds (Buyer)
Another area in which the title agent or company plays a role is to provide the closing disclosure outlining all the closing costs due beforehand. The information may be confusing, so don’t be afraid to ask about it if you’re unsure.
Once you’ve reviewed the closing disclosure, you must wire the funds to the title company before closing. Be wary of any confusing instructions or suspicious emails, as there is great potential for wire fraud.
Step Nine: Sign Loan Documents/Closing Paperwork (Buyer/Seller)
Once the title work is complete and the lender clears the deal to close, it’s time to sit down at the closing table. You’ll meet with a closing agent from the title company who will review everything with you, so don’t be afraid to ask questions. You’ll need a little patience as the process requires a lot of paperwork.
Make sure to bring the following items:
- A government-issued ID to verify your identity
- A copy of the purchase agreement
- A standard check or cashier’s check to cover remaining closing costs (depending on the contract terms)
- Proof of homeowner’s insurance
—> Read more on the eClosing ecosystem and how it works, and a couple’s experience
Step Ten: Get Your Keys (Buyer) or Receive Your Funds (Seller)
You signed all the paperwork, the due diligence is done, and the funds have been wired either to the seller or received from the buyer – that’s it. The keys are yours and you can now officially move into your new home!
Now that you’ve seen the process broken down, you should feel more confident to tackle the purchase or sale of a property. While PropLogix works primarily with title agents, we believe that the transaction process should be transparent for everyone involved. Check out our resource center for more homebuying and selling tips!